Embed a HubSpot Meeting Scheduler in Webflow (No Redirect)
By Mission SEO staff
· 16 min read
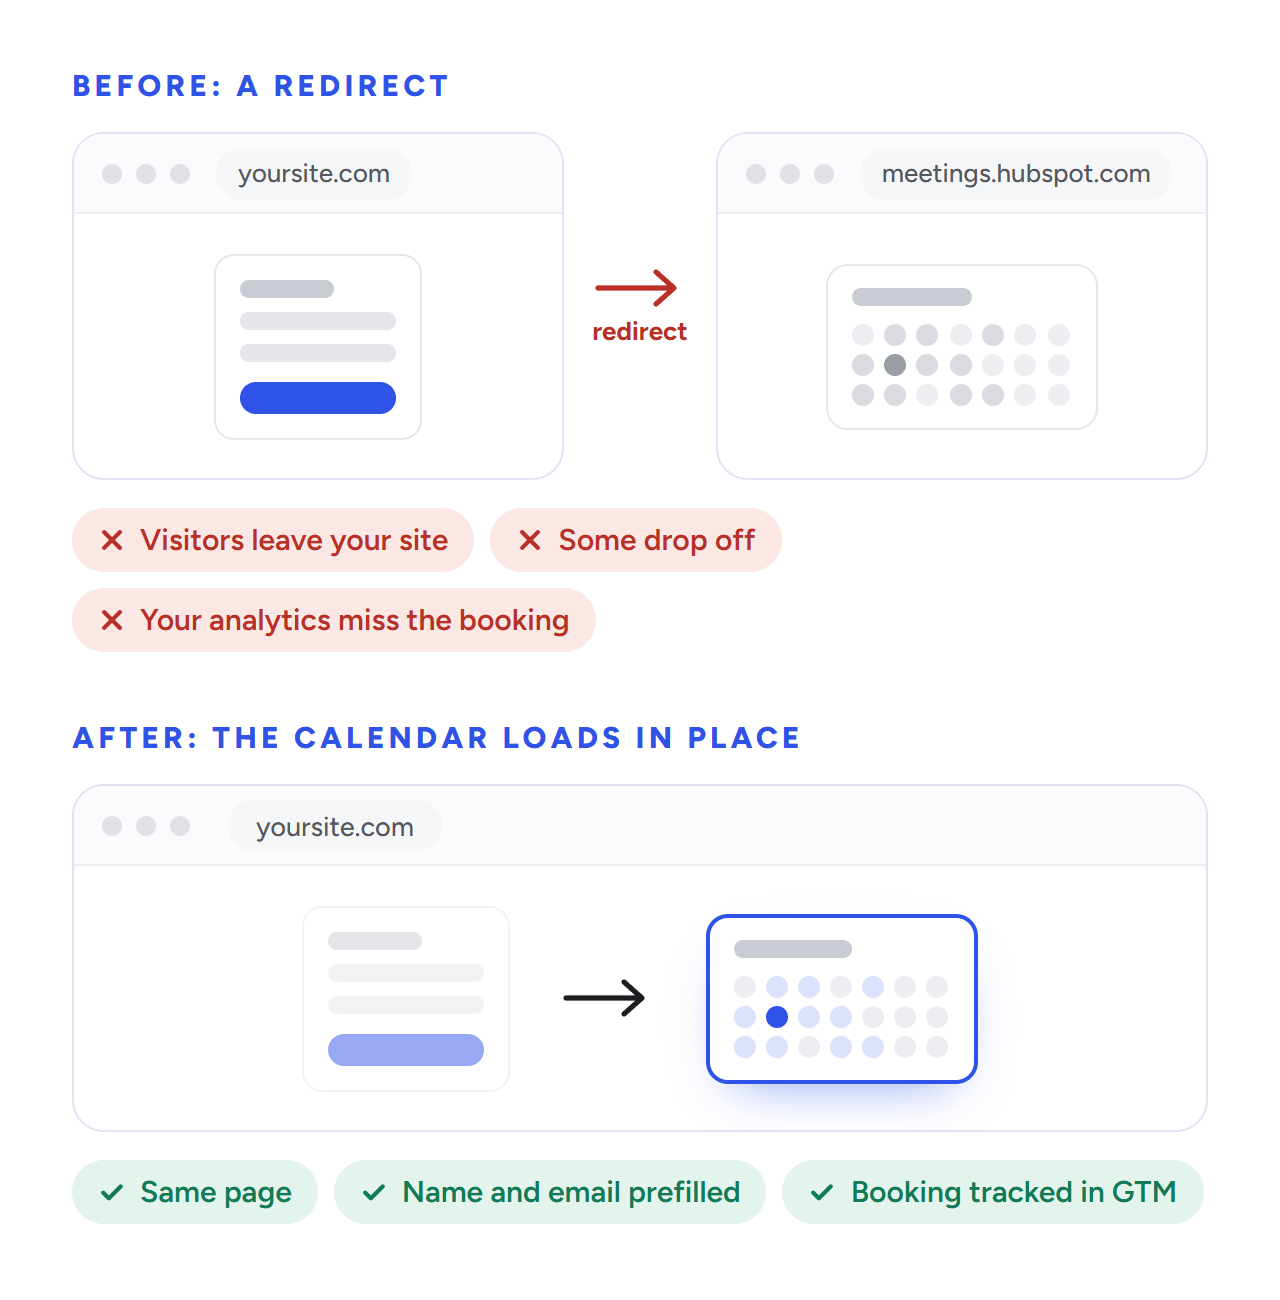
If your site runs on Webflow and your CRM is HubSpot, your demo flow probably works like this: a visitor fills out a HubSpot form, then gets sent to a meetings.hubspot.com page to pick a time. It works, but the hand-off costs you. The visitor leaves your site, your branding and navigation disappear, some people drop off before the second step, and your analytics never see the booking, which is the conversion you actually care about.
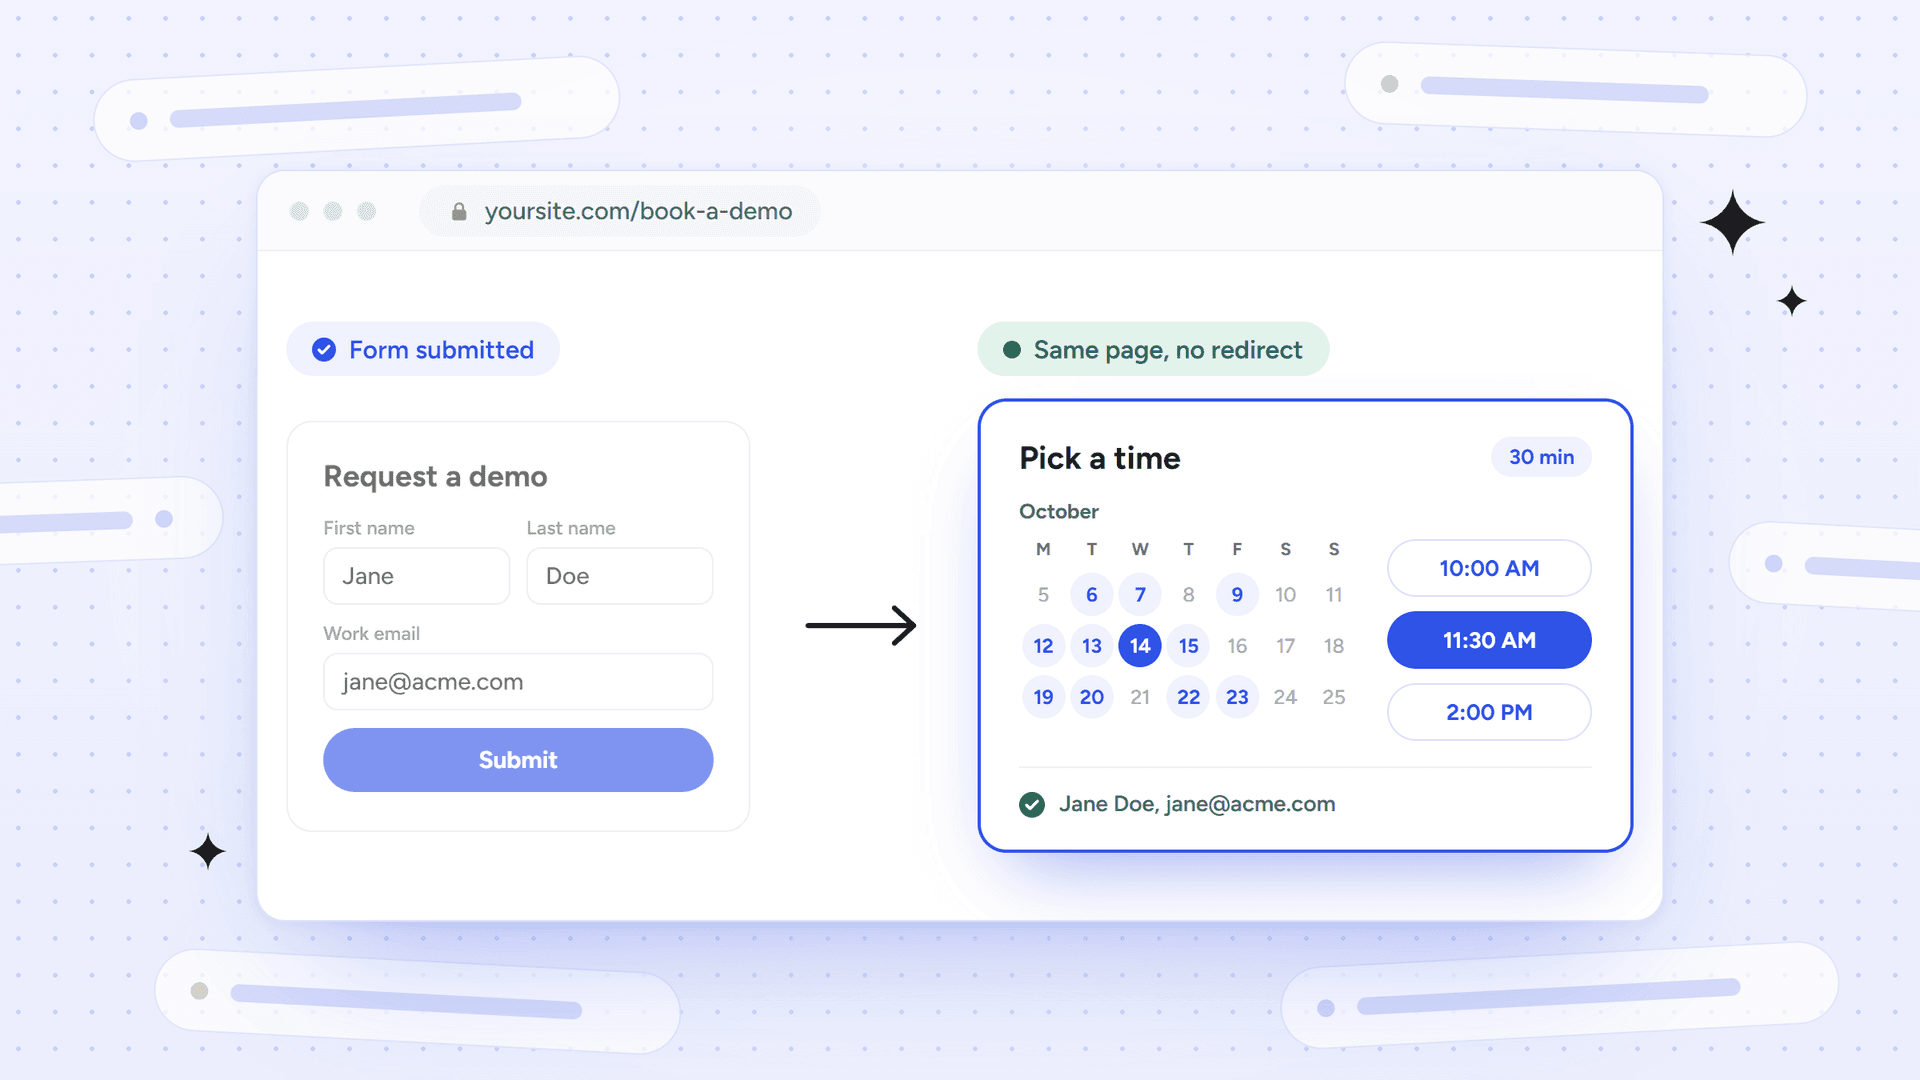
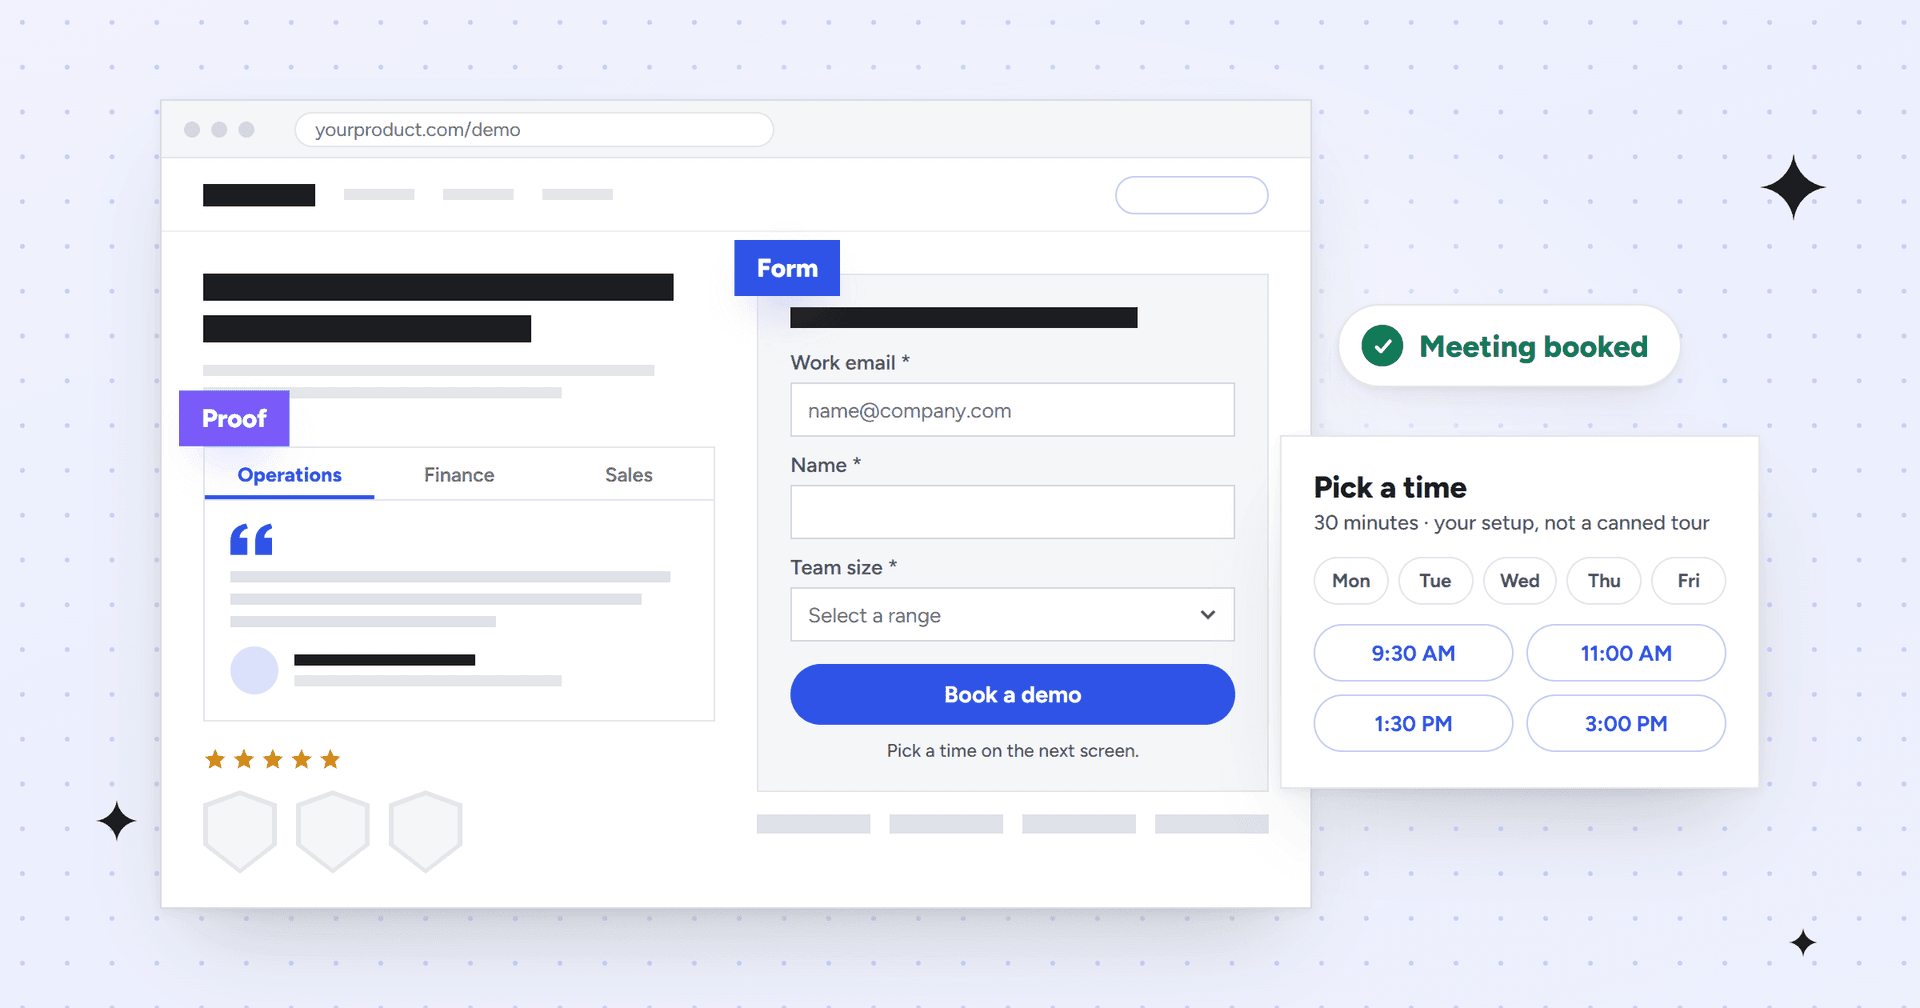
We recently moved a B2B SaaS client’s demo flow off that redirect by embedding the HubSpot meeting scheduler in Webflow, right where the form was. Now the calendar loads on the same page the moment the form is submitted, the visitor’s name and email are already filled in, and every booked meeting fires a conversion event in Google Tag Manager. This guide covers the exact setup, the code, and the problems we ran into along the way.
Quick answer: HubSpot’s built-in option to send a form straight to a scheduling page needs Sales Hub or Service Hub Enterprise, and it’s still a redirect. To keep visitors on your Webflow page without an Enterprise plan, set the form to show a thank-you message, then add a short script that listens for HubSpot’s form submission event and loads the meeting scheduler in place of the form. The script passes the visitor’s name and email into the meeting link, so they don’t have to type them twice.
What you’ll end up with
Visitors fill out your HubSpot form on your Webflow page, as they do today.
When they submit, the HubSpot calendar replaces the form in the same spot. No redirect, no new tab.
First name, last name and email carry over from the form to the booking form.
Every booked meeting pushes a hubspot_meeting_booked event to Google Tag Manager, so you can track booked demos, not just form fills, in GA4 and Google Ads.
If the calendar ever fails to load, a thank-you message with a booking link catches the visitor.
What you need before you start
Where
What you need
Why
HubSpot
A form built in the updated form editor
The script listens for HubSpot’s global form events, which only fire for forms built in the updated editor.
HubSpot
A scheduling page and its link
One-on-one, group and round robin pages all work.
HubSpot
Permission to edit forms
You’ll change what happens after someone submits the form.
HubSpot
The tracking code on your site, and your site’s domain added in the tracking settings
HubSpot needs the tracking code to report on embedded forms, and it marks submissions from domains that aren’t added as spam.
Webflow
A paid Site plan, or a Core, Growth, Agency or Freelancer Workspace
The Code Embed element needs one.
Webflow
The Designer or Site Manager role on the site
The Marketer and Content Editor roles can’t edit custom code.
Step 1: Copy your meeting link
In HubSpot, go to Sales > Meetings Scheduler. In some accounts, it’s under More.
Scheduling pages belong to individual users, and the list shows one owner’s pages at a time. If you don’t see the page you need, pick its owner from the Owner dropdown at the top left. The link usually includes the owner’s name, for example meetings.hubspot.com/jane-doe/demo.
Hover over the scheduling page and click Copy link.
Keep the link exactly as you copied it. Team links, like round robin pages, often end in a ?uuid= parameter, and the script adds its own parameters after it. Also note the domain. Depending on which HubSpot data center your account uses, the link starts with meetings.hubspot.com, meetings-eu1.hubspot.com or meetings-na2.hubspot.com. The script reads the domain from your link, so you don’t need to change anything, but the domain explains one of the bugs in the troubleshooting section.
You don’t need the scheduling page’s own embed code for this setup, just the link. Anyone with access to the meetings tool can view other users’ scheduling pages and copy their links, but only Super Admins can edit them.
Step 2: Copy your form’s embed code and ID
Go to Marketing > Forms and open the form you use for demo requests.
In the top right, click Review and update, then Update.
Click Get embed code, then Copy.
Forms from the updated editor produce embed code like this. Your portal ID, region and form ID will differ, so always use the version HubSpot gives you:
The data-form-id value is your form ID, which goes into the script in the next step. If your embed code contains hbspt.forms.create instead, the form was built in the legacy editor, and the events this script listens for won’t fire. See the troubleshooting section.
Leave the redirect alone for now: Don’t change the form’s redirect settings yet. The order of the next three steps matters.
Step 3: Add the script to your Webflow page
Open the page in the Webflow Designer. The mode switcher at the top left should say Design. If it says Build and clicking it does nothing, your role can’t edit code (see “You can’t edit the Code Embed in Webflow” below).
If the form is already on the page in a Code Embed element, double-click that element to open its code editor. If not, open the Add panel, drag a Code Embed element to where the form should appear, and paste the form’s embed code into it.
Paste the script below directly under the form’s embed code, then replace the two values at the top with your form ID and meeting link.
Click Save & Close.
<script>
(function () {
  /* 1. Your form ID: the data-form-id value in HubSpot's embed code */
  var FORM_ID = "YOUR_FORM_ID";
  /* 2. Your meeting link, exactly as copied from HubSpot */
  var MEETING_URL = "https://meetings.hubspot.com/your-name/your-meeting";
  var MEETING_ORIGIN = new URL(MEETING_URL).origin;

  /* Fit the calendar to its content, and tell GTM when a meeting is booked */
  window.addEventListener("message", function (e) {
    if (e.origin !== MEETING_ORIGIN || !e.data) return;
    if (e.data.height > 300) {
      var frame = document.querySelector("#demo-calendar iframe");
      if (frame) frame.style.height = e.data.height + "px";
    }
    if (e.data.meetingBookSucceeded) {
      window.dataLayer = window.dataLayer || [];
      window.dataLayer.push({ event: "hubspot_meeting_booked" });
    }
  });

  function showCalendar(fields) {
    if (document.getElementById("demo-calendar")) return;

    /* Carry first name, last name and email over to the booking form */
    var url = new URL(MEETING_URL);
    url.searchParams.set("embed", "true");
    (fields || []).forEach(function (field) {
      var prop = String(field.name).split("/").pop();
      if (["firstname", "lastname", "email"].indexOf(prop) > -1 && field.value) {
        url.searchParams.set(prop, field.value);
      }
    });

    var selector = '.hs-form-frame[data-form-id="' + FORM_ID + '"]';
    var form = document.querySelector(selector) ||
      document.querySelector(".hs-form-frame");
    if (!form) return;

    /* Put the calendar where the form is, not below it */
    var box = document.createElement("div");
    box.id = "demo-calendar";
    var calendar = document.createElement("div");
    calendar.className = "meetings-iframe-container";
    calendar.setAttribute("data-src", url.toString());
    box.appendChild(calendar);
    form.parentNode.insertBefore(box, form);

    var script = document.createElement("script");
    script.src = "https://static.hsappstatic.net/MeetingsEmbed/ex/MeetingsEmbedCode.js";
    document.body.appendChild(script);

    /* Once the calendar has loaded, hide the form and scroll to the calendar */
    var tries = 0;
    var timer = setInterval(function () {
      if (box.querySelector("iframe")) {
        clearInterval(timer);
        form.style.display = "none";
        /* 140 = room for a sticky header; adjust it to fit your site */
        var top = box.getBoundingClientRect().top + window.pageYOffset - 140;
        window.scrollTo({ top: top, behavior: "smooth" });
      } else if (++tries > 50) {
        clearInterval(timer);
      }
    }, 200);
  }

  /* When this form submits successfully, show the calendar */
  window.addEventListener("hs-form-event:on-submission:success", function (event) {
    if (!event.detail || event.detail.formId !== FORM_ID) return;
    try {
      HubSpotFormsV4.getFormFromEvent(event).getFormFieldValues()
        .then(showCalendar, function () { showCalendar([]); });
    } catch (err) {
      showCalendar([]);
    }
  });
})();
</script>
Here’s what the script does:
It waits for HubSpot’s success event.hs-form-event:on-submission:success fires once a submission goes through, including after the last step of a multi-step form. Submissions from any other form on the page are ignored.
It carries the name and email over. HubSpot’s booking form reads firstname, lastname and email parameters from the meeting link, so the script adds the submitted values to the link.
It puts the calendar where the form was. The calendar goes in above the form, and the form is hidden once the calendar has loaded.
It resizes the calendar and tracks bookings. A message listener fits the calendar’s height to its content and pushes a dataLayer event when a meeting is booked.
It loads the calendar only when it’s needed. HubSpot’s meetings script loads after someone submits, so it adds nothing to the page’s initial load.
If your site’s sticky header is taller or shorter than average, change the 140 in the script. It’s the space the page leaves above the calendar when it scrolls to it.
On the Webflow canvas, the embed shows a notice that it only displays in preview mode or on the published site. That’s normal. Scripts don’t run in the Designer, so you’ll test on the published page.
Step 4: Publish the Webflow site first
Publish to your staging and live domains before you change anything in HubSpot. While the form still redirects, the script never gets a chance to run, because HubSpot leaves the page before the calendar can load. Publishing first is safe, and it means the live site is ready the moment you change the form.
Keep in mind that publishing in Webflow pushes every unpublished change on the site, not just yours. If other people edit the site, check with them first.
Step 5: Turn off the redirect in HubSpot
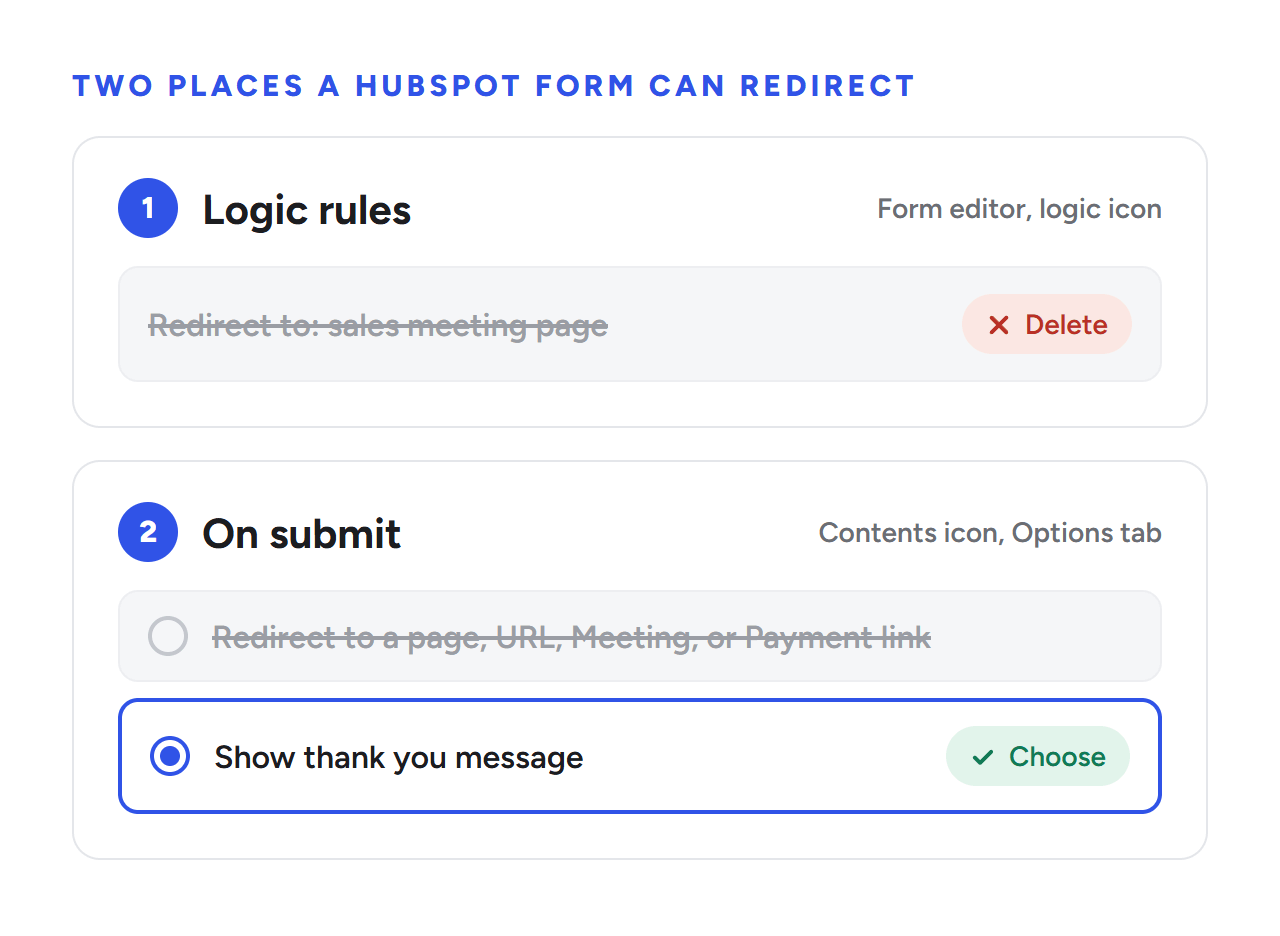
This is the step most guides skip, and the one that caught us out. A HubSpot form can redirect from two places, and you have to clear both before the calendar can appear:
Logic rules. In the form editor, click the logic icon in the left sidebar. Rules with a Redirect to action, such as a rule that sends every submission to a sales meeting page, run when the form is submitted. Screenshot each rule so you can restore it later, then delete it.
On submit. Click the contents icon, then On submit, and open the Options tab. If it’s set to Redirect to a page, URL, Meeting, or Payment link, change it to Show thank you message.
Check both before you click Update: The On submit setting is the fallback for anyone the logic rules don’t catch. On our client’s form, it pointed at the product’s sign-in page. The moment we deleted the redirect rules, every demo request landed on a login screen, until we changed On submit too.
Also check what the rules actually do. If they redirect only some visitors, for example companies above a certain size, deleting them shows the calendar to everyone. In that case, have a developer add the same condition to the script before you remove the rules. The submitted values are already available in it.
Next, write the thank-you message as a safety net. The script hides it as soon as the calendar loads, so most visitors barely see it, but if the calendar is blocked, it still gives them a way to book. For example: “Thanks! If the calendar doesn’t appear in a few seconds, book your demo here,” with “here” linking to your meeting link.
Finally, click Review and update, then Update. Form changes don’t go live until you do.
Step 6 (optional): Simplify the booking form
Open the scheduling page in Meetings Scheduler and check its booking form settings. Pre-populate fields with known values lets HubSpot fill in details for contacts it recognizes. Auto-submit form when all fields are pre-populated submits the booking form automatically when every field is already filled in. Auto-submit doesn’t work if the page has custom questions, because those answers aren’t saved to contact properties, so remove any questions your form already asks. Test the result either way, and note that only Super Admins can edit another user’s scheduling page.
Step 7: Test the full flow
Open the live page in an incognito or private window, so your own HubSpot cookies don’t prefill or skip anything.
Fill out every step of the form and submit it.
Check that there’s no redirect and that the calendar replaces the form.
Pick a time and check that the name and email are already filled in.
Check that the calendar fits without its own scrollbar, on desktop and on your phone.
Book the meeting and confirm it appears on the contact record in HubSpot.
Cancel the test booking, since it’s on a real person’s calendar.
If anything breaks, set the form’s On submit option back to its old redirect and click Update. That restores the previous flow while you debug.
Track booked meetings in GA4 and Google Ads
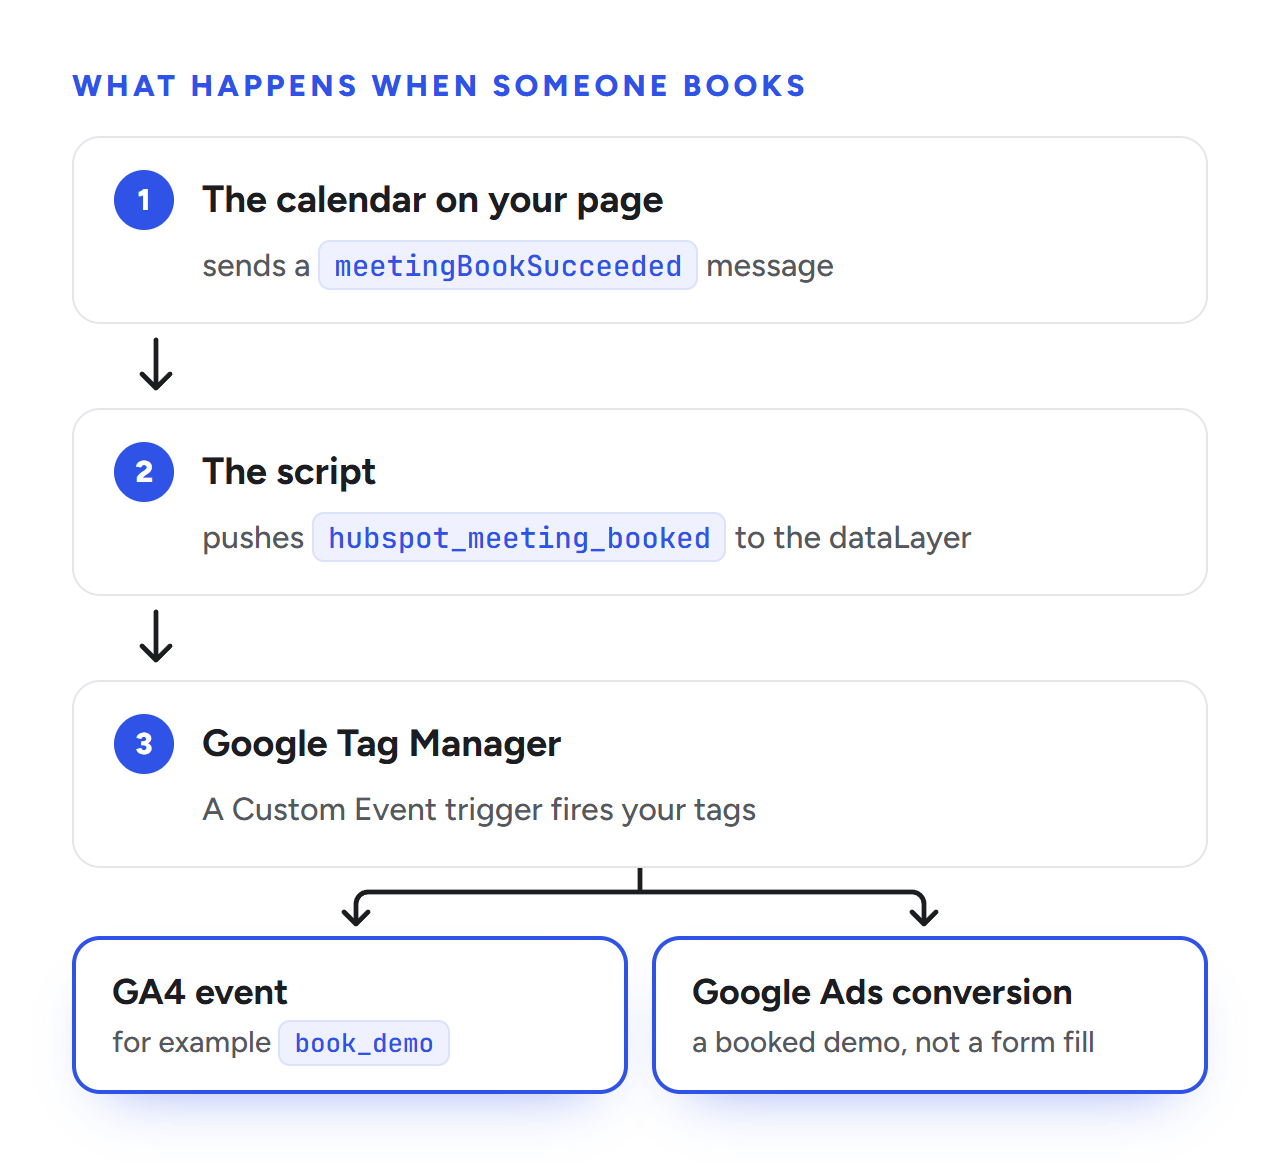
When someone books, the embedded calendar sends a meetingBookSucceeded message to your page, and the script turns it into a hubspot_meeting_booked event in the dataLayer. To use it:
In Google Tag Manager, go to Triggers > New > Custom Event and set the event name to hubspot_meeting_booked.
Attach your GA4 event tag (for example, book_demo) and your Google Ads conversion tag to that trigger.
Use GTM’s Preview mode to book a test meeting and confirm the event fires, then publish the container.
This is one of the biggest wins of embedding the calendar. A form fill isn’t a booked meeting, and when visitors book on HubSpot’s own meetings page, your GTM container never sees it. With the calendar on your page, you can measure booked demos and optimize ad campaigns toward them instead of form fills.
If you’ve borrowed tracking snippets from elsewhere, check the origin they test for. Many compare event.origin with https://meetings.hubspot.com, so they never fire for accounts on other HubSpot data centers. The script above reads the origin from your meeting link instead.
Troubleshooting
The form still redirects to the HubSpot meetings page
A redirect rule is still active, or the form changes aren’t live yet. Delete any Redirect to rules in the logic panel, confirm On submit is set to Show thank you message, then click Review and update and Update. Wait a couple of minutes and test again in a new incognito window.
Visitors land on another page after submitting, like a login screen
That’s the On submit fallback. With the logic rules gone, every submission gets the On submit behavior. Change it to Show thank you message and update the form.
The calendar appears far below the form
In our build, the form’s iframe kept most of its height after submission, even though it only showed a short thank-you message. A calendar added below the form ended up under a large empty block. The script avoids this by inserting the calendar above the form and hiding the form once the calendar loads. If you’re using your own version, check where it inserts the calendar.
The HubSpot meeting embed doesn’t resize
HubSpot’s embed script only resizes the calendar when the resize message comes from a built-in list of HubSpot domains. When we checked in September 2026, that list included meetings.hubspot.com and meetings-eu1.hubspot.com but not meetings-na2.hubspot.com, so calendars from NA2 accounts stayed at a fixed height. The script’s own listener resizes the calendar for any domain. It also ignores very small height values: on first load, we saw the calendar report a height of about 25 pixels, which left it with an inner scrollbar.
Webflow says the embed only displays in preview mode or on the published site
That’s expected. Webflow doesn’t run scripts on the Designer canvas. Test on the published site, or in preview mode with custom code enabled.
You can’t edit the Code Embed in Webflow
If the mode switcher at the top left says Build and clicking it does nothing, your site role is probably Marketer or Content Editor. Marketers can build pages from components and Content Editors can edit content, but neither role can edit custom code. You can ask for the Designer role, have someone with the Designer role paste the code, or, if the site runs Google Tag Manager, add the script as a Custom HTML tag that fires on all pages.
Use one method only. With the script in both Webflow and GTM, every booking is counted twice. And if you go the GTM route, the script only runs when GTM loads, so a consent banner that holds GTM back, or an ad blocker, can stop it. That’s why the Webflow embed is the more reliable home for it.
You can’t find the scheduling page in HubSpot
Scheduling pages belong to individual users. In Meetings Scheduler, switch the Owner dropdown to the page’s owner. The meeting link usually includes the owner’s name, which tells you whose pages to check.
The name and email aren’t prefilled
The script copies HubSpot’s default firstname, lastname and email properties. If your form collects these with custom properties, switch those fields to the default properties.
You’re using a legacy HubSpot form
If your embed code contains hbspt.forms.create, the form was built in the legacy editor, and the global form events this script listens for won’t fire. Rebuild the form in the updated editor, or have a developer adapt the script to the legacy embed’s onFormSubmitted callback.
Other ways to do it
HubSpot’s built-in redirect to a scheduling page. HubSpot can send a form straight to a meeting link and fill in the submitted fields, but only on Sales Hub or Service Hub Enterprise, and visitors still leave your site.
A separate booking page. Redirect the form to a second Webflow page that holds only the meeting scheduler embed. There’s no custom script, but prefill depends on HubSpot recognizing the visitor’s cookie, which can lag right after a submission.
Google Tag Manager. The same script works as a Custom HTML tag when you can’t edit the Webflow page, with the caveats above.
Frequently asked questions
Do I need HubSpot Enterprise to show a calendar after a form submission?
No. Enterprise is only required for HubSpot’s built-in option to redirect a form to a scheduling page. Embedding the meeting scheduler on an external site is available on all HubSpot plans, and the script in this guide handles the hand-off from form to calendar.
Will visitors have to enter their name and email twice?
No. The script passes the first name, last name and email from the form into the meeting link as URL parameters, and HubSpot uses them to fill in the booking form.
Does this work with multi-step HubSpot forms?
Yes. HubSpot’s submission success event fires after the final step is submitted, and that’s when the calendar appears. We built this on a two-step form.
Can I track booked meetings in GA4 and Google Ads?
Yes. The embedded calendar sends a message to your page when someone books, and the script turns it into a hubspot_meeting_booked dataLayer event you can use as a Google Tag Manager trigger. That isn’t possible when visitors book on HubSpot’s own meetings page.
Will the meeting scheduler slow down my page?
Not before someone submits. The script loads HubSpot’s meetings script only after the form is submitted, so it adds nothing to the initial page load.
Does this work for HubSpot accounts on the EU1 or NA2 data centers?
Yes. The script reads the domain from your meeting link and resizes the calendar itself, which covers data centers that HubSpot’s own embed script doesn’t resize.
The bottom line
Keeping the booking on your own page removes a hand-off between “request a demo” and “demo booked,” keeps visitors inside your branding, and gives you a booking event you can measure and optimize ad campaigns against. The setup itself is small: one script in Webflow, two settings in HubSpot, and a careful test.
Want it set up and tested for you, including booked-demo tracking in GA4 and Google Ads? Talk to the Mission SEO team.
We’re a B2B SEO and AEO agency. Book a free 30-minute call with a senior consultant: we look at your site before we talk, so you leave knowing what to fix first.

 best project management software